In this blog post and new video, I cover all the essential tools needed to make good bark tanned leather as well as a few non-essentials. Tanning materials will have to be treated separately and I will try to revisit many of these tools and their making in the future.
Real natural vegetable tanned leather is that which is tanned with tannic acid sourced from plant materials. While there are excellent sources of tannin in not just barks, but in roots, leaves, pods, fruits, nuts and wood, tree barks are the most used sources, thus the common term bark tanning. There are only a few tools and materials that could be considered essential to the process and none are complicated. In fact, if you strip it down to the real essentials, you need very little. Adding a few simple tools will improve your experience though, and in some cases your leather.
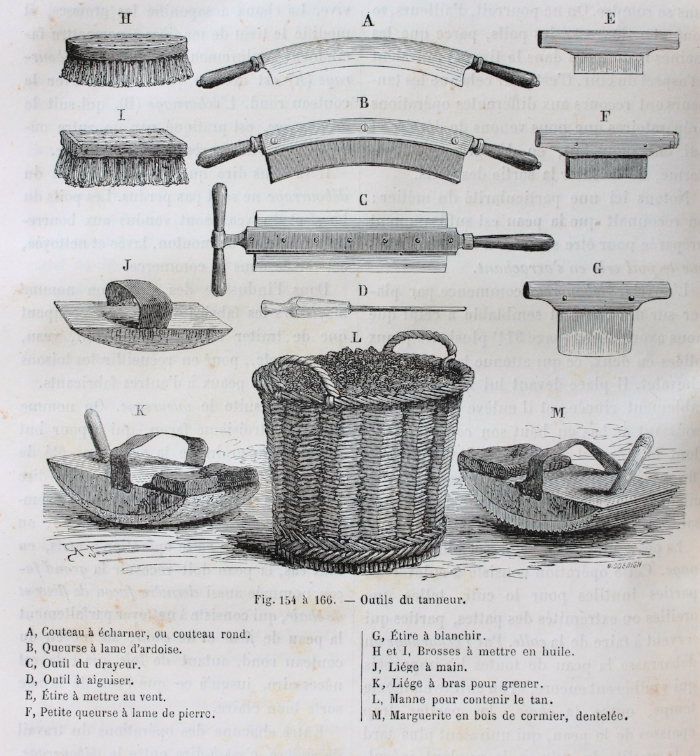
Some tools of the Tanner and Currier, most of which are discussed in this article. The slate bladed two handled knife B is especially intriguing. I need to make me one of them.
FLESHING KNIFE
The tanner’s knife, or fleshing knife, is the most important multi-tasking tool of the tanner. In a typical vegetable tanning process, I will use this tool for fleshing, dehairing, re-fleshing, scudding, removing excess water and stretching open the skin. It is also handy when re-soaking dried hides to work open dry spots so that they rehydrate faster. Many new models are available on the market, but a lot of home tanners get by well with homemade tools. Read my blog post on fleshing knives, and watch the Fleshing Knives 101 video for more than you probably wanted to know about them. I just received the Wiebe 12” Fleshing knife in the Mail so I can review it for you guys. I like the overall form a lot for general use, and was told by a dealer that it is actually tempered tool steel, not mild steel. Aside from the potentially weak, narrow and probably short tangs, it looks promising, but I haven’t had a chance to use it at all yet. Aside from unknown potential steel/tempering issues and iffy tangs, as a general purpose home tanning knife it seems likely to be a good choice for under 30.00 shipped.

A collection of tanner’s knives
BEAMS
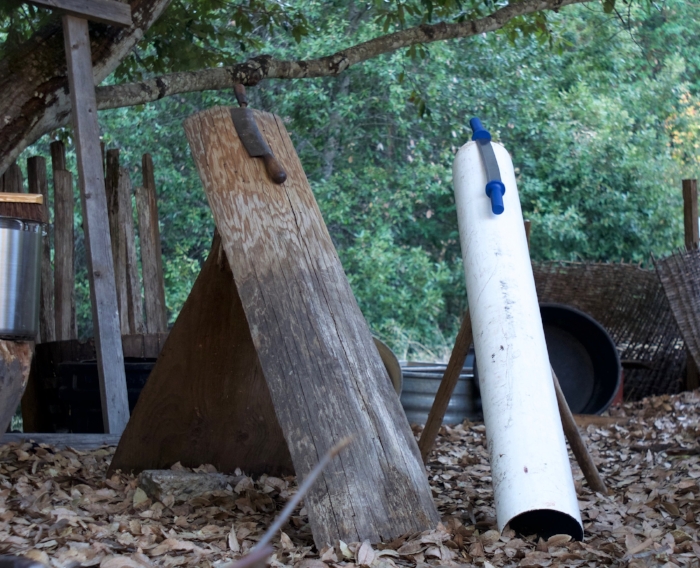
Wood and plastic beams. Left is the outside cur from a log mill and the other is cheap ABS, though PVC would be much better, thicker, more durable and heavier. I haven’t used plastic beams much, but I can see why people might need to use them.
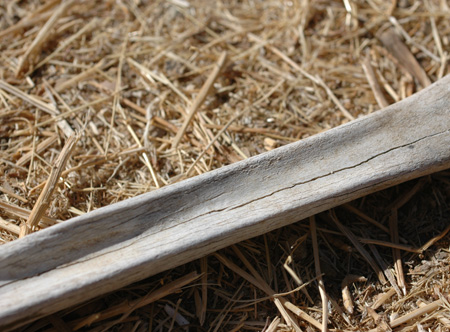
The tanners all purpose scrapping knife is of no use without a beam. For most, a beam around 6 to 6.5 feet long will do well. I’m currently using. 6.25 foot beam, which is just about right for me. It can be of wood or plastic pipe. If wood, it is best to have a smooth work area that is free of knots, large cracks, grain tears or other major blemishes extending at least 18 inches down from the top. I would try to stick with 8” diameter and larger, but to get started, or in emergencies, you can use a smaller diameter beam. If the diameter is very small, you can flatten off the working area to a larger radius. A very small radius results in a small area of contact between the tool and the beam surface. For most vegetable tanning related beam tasks, a larger surface contact between beam and tool is preferable. Large logs should be at least split in half, or even hollowed on the underside to thin them. Most of my old beams were hollowed out on the underside with a hatchet to reduce weight and discourage cracking. Taking the center of the log out by splitting it in half will reduce both the incidence and severity of cracking. Reducing the thickness further will reduce that risk even more. It doesn’t have to look pretty, just chop out some of the wood to form a hollow on the underside.
A good source of nearly ready made beam material are the round sided slab cuts from the outsides of logs removed in milling lumber. You may be able to get some from a local mill, or small custom miller. Check the phone book (under lumber, milling?) or ask about local portable mill owners at your chainsaw dealer or repair shop.

If making a beam out of lumber, choose vertical grain like this over plain sawn face grain if possible as it will be less likely to crack. This is never a choice with a round or split log.
I haven’t done it, but I suspect a pretty good beam could be made by radiusing the working area of a 2x12. I don’t seen any good reason it wouldn’t work. If so, try to choose one that has edge grain on the working face and not face grain. that is to say that the rings of the tree run from about 45 degrees or more toward straight through the thickness of the board. This is usually referred to as vertical grain and will be much less prone to cracking than plain sawn wood faces.
Now that I’m thinking about it, an edge grain (if you can find that good of a board these days) 2x12, backed by another 2x12 could make a pretty nice beam. I would leave a slot in the backing board for a plywood stand, augmented by two 4x4’s firmly attached with lagbolts similar to the arrangement pictured below. For a firmer union, wedges could be used to afix the plywood in the slot.
You can do many different things to put legs on the beam. A good option is to drill large holes, about 2 inches in diameter and plug in round wooden staves for supports. My current beam has two closely spaced boards screwed to the bottom on edge, just far enough apart to slide in a piece of plywood as a support. It works well enough.
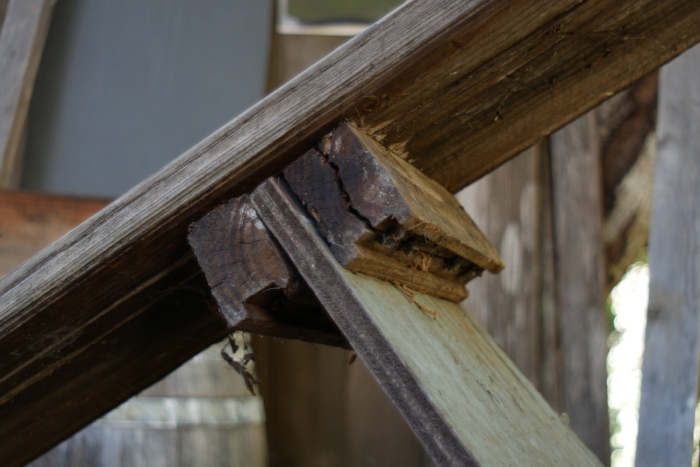
Simple support that is easily taken down for transport. I would use 4x4’s next time.

DRAW KNIFE AND SPOKE SHAVE

Maintenance tools. The drawknife is probably more versatile and essential than the spokeshave.
These tools are used for creating and maintaining, a smooth beam surface. It is ideal to have both. The draw knife is best for major wood removal and repair, and the spoke shave for maintenance and smoothing. You can get away with just one of them though, in which case the draw knife is the more versatile of the two. Draw knives are also handy for peeling tan bark from logs if it is not slipping off easily. If you intentionally shred the bark off of the log in small, thin slices, you may not have to chop it any finer for extracting the tannins.
When shopping for used draw knives watch out for two things, wear on the blade and rounded bevels on the back side. Old draw knives can sometimes suffer severe wear. Look to see that the blade is about the same width it’s whole length. It should also be flat on the back with a bevel on the top side only. Either by long wear, or by mis-sharpening, the back is sometimes not flat. In a very well used knife the back may be subtly dished or rounded off, but if it has an obvious bevel or extreme wear, steer clear.
I would not recommend buying a spoke shave that has only one screw to adjust and no fine adjustment screws. The type shown is common and works well.
WATER AND HOSES
Water is not just a material, it’s a tool for cleaning things off. Skins, tools, boots, hands and tubs need frequent rinsing You will use a lot of water, and the more convenient and available it is the better. I usually use a standard hose end shut off valve to control flow. I like these valves better than most purpose made sprayers, because when opened wide the flow is fairly high, which is nice when you are filling containers with water a lot. If opened only part way, the shut off valve makes a reasonable sprayer for cleaning things off. As far as I have seen, craftsman rubber hoses are the best deal going when they are on sale in the spring, which they usually are.
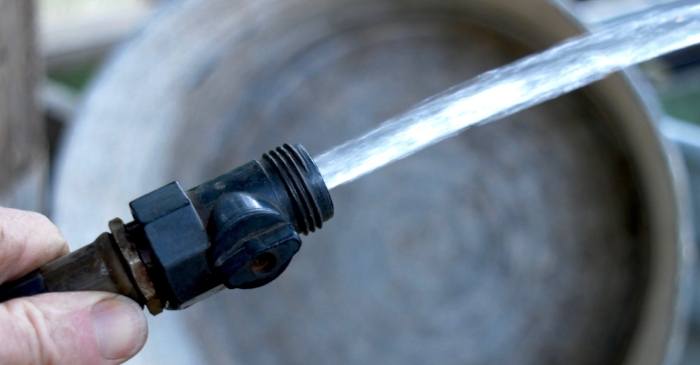
Better than any sprayer I’ve tried when you want high flow.

Passable spray pattern and volume if not as good as a purpose made sprayer.
BRUSHES
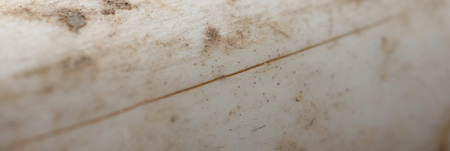
A stiff cleaning brush will be found almost indispensable for tubs, aprons, beams and tools. You may also need a finer brush to scrub bloom off of the grain side of skins. Bloom is a whitish deposit that forms on the grain surface during tanning. It is more common with certain tanning materials and also when layering or pit tanning is used.
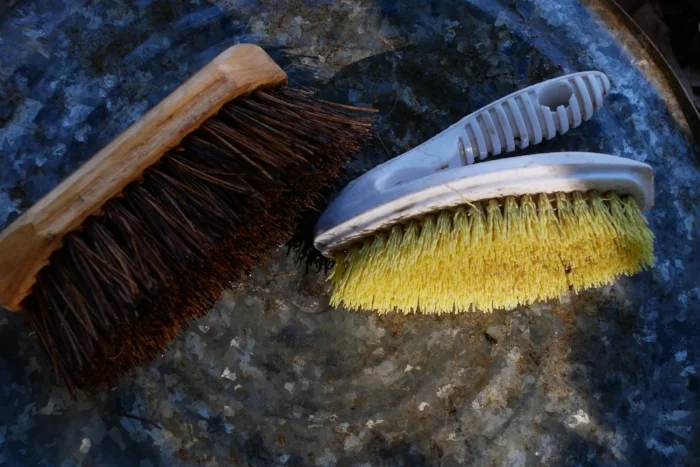
Stiff brushes for cleaning tubs, tools and beams are almost essential

Surface on the right shows bloom deposited in the tanning process. The section on the left has been scrubbed clean with an old hair brush with medium bristles. The dark stain in the center is where the skin floated above the surface of the tan liquor :-/
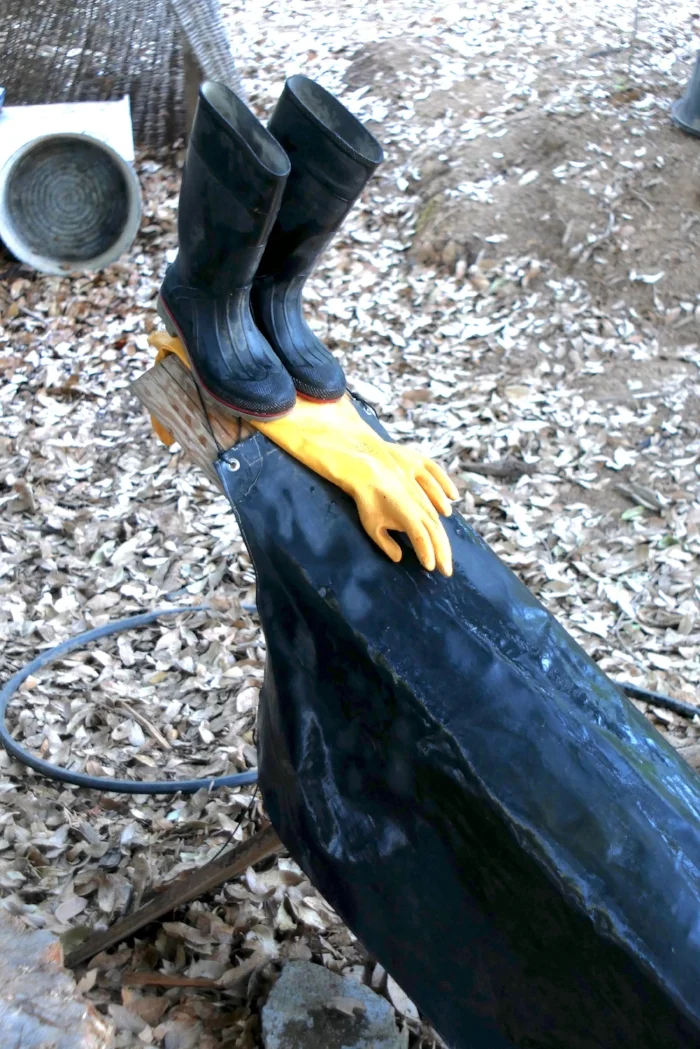
PROTECTIVE CLOTHING
BOOTS: Rubber boots are very nice to have if you do a lot of tanning. If you don’t wear them, the hide will inevitably drip all over your feet as you stand at the beam working.
GLOVES: I tanned without gloves for years, but I love my elbow gloves now. Don’t bother with dishwashing gloves, or any other short gloves. You will inevitably reach into a solution and they will fill with smelly liquid. I use these affordable Atlas gloves, which have held up okay. When they die, I may invest in a more heavy duty glove.
APRON: I would avoid buying very cheap aprons. I am still using the same two heavy duty black, rubberized cloth aprons that I bought used at a yard sale over 20 years ago. You can make one from a sheet of vinyl or plastic of some kind, or tie a trash bag around your waist, but if you tan a lot, the protective gear is really nice to have. Hip waders are great if you already own them.
Non-Essentials, but so nice to have!
CONTAINERS
Vegetable tanning requires certain kinds of containers. Materials that can be safely used for all the processes are wood, plastic and rubber, ceramic, stainless steel and enamel ware. I use galvanized tubs, but only if there is no rust at all on them, and for liming and rinsing only. Aluminum I’ve used for rinsing only. I know aluminum and ashes don’t mix well but I don’t know about lime. While I have no idea if aluminum is safe for tanning liquors, I’ve avoided it. Anything that rusts is out of the question for all processes related to vegetable tanning except for dyeing the skin black. Any rust or iron will darken the skin permanently.

The common rectangular plastic storage tubs with lids are the most versatile. Choose designs that can be rained on without funneling any water into the tub if possible. Some do not have that kind of overhang on the lids, or have holes of some kind on the edges. All of these others also get used, but none are particularly better than rectangular tubs.
The ubiquitous 5 gallon plastic buckets are handy to have around for various uses, but tanning anything over the size fur bearers in buckets is unpreferable. Large rectangular plastic storage tubs of 15 gallons and up are very useful as are other large tubs of various sorts. I have used wooden wine barrels cut in half quite a lot. They look really great, but aesthetics aside, they have their down sides. Wooden barrels need to be kept filled with water, or they dry out and fall apart. Since they need to be full of water, they breed mosquitoes unless you dump them regularly and they are quite heavy when full. You can tan hides up to the size of deer in half wine barrels very easily and sometimes large hides if you get creative. The size of the container should be adequate for the size of skins you are tanning. Without getting into specific details, an 18 to 20 gallon tub is adequate for deer, goat and similar sized animal skins. I’ll usually cut cattle and other large hides into sides and bellies, and those pieces can be tanned in a half wine barrel or large rectangular tub easily enough.
Rectangular tubs are an advantage over round ones, when layering, a technique where you put layers of shredded bark between layers of hide and let it sit for a month or three. I can layer a deer hide well in an 18 or 20 gallon tub, by carefully folding it up with layers of bark between all the folds, but if layering a larger hide, or even a very large deer skin, you’ll need to size the tub up. For liming, rinsing, or tanning the skins in liquors, round containers have the slight advantage in being easy to stir, but that is not important enough to favor buying them over the more versatile rectangular tubs. Use what you have or can get cheap or free if it works, but if you buy something storage tubs with lids are probably the best all around. If you are tanning cattle, elk, moose, horse or buffalo skins, and want to keep them whole (not a very good idea unless you really need it that big), start keeping your eye peeled for larger containers. However, too large is too large. You don’t want to have to use excess amounts of liquid to tan, rinse or lime a hide.
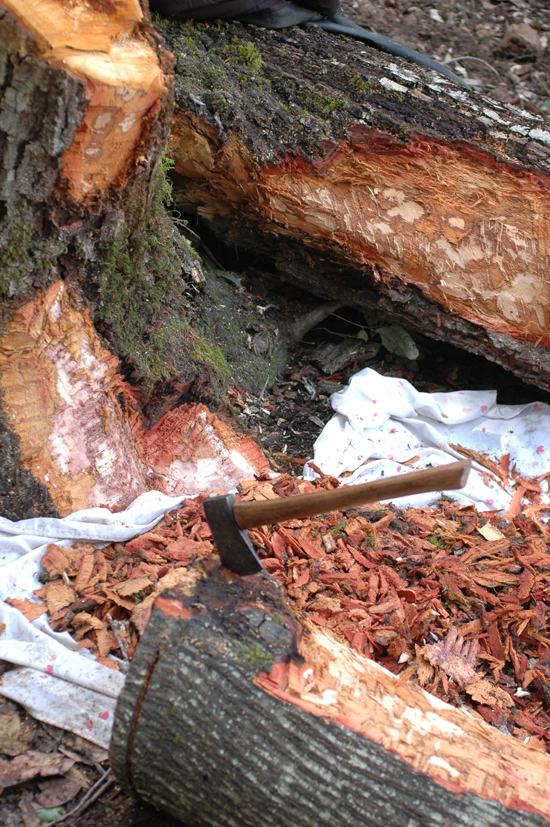
BARK CHOPPING
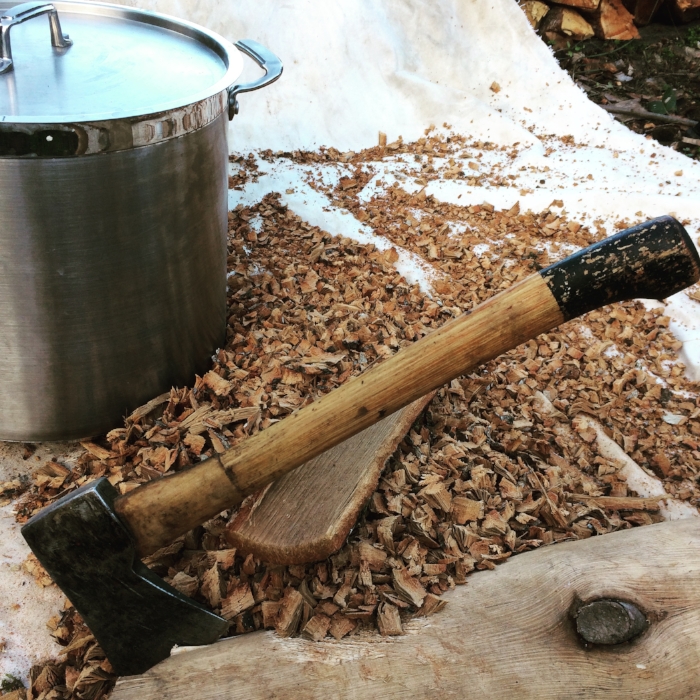
Primitive and slow, but effective enough. The benefits are that it makes you slow down and chill out, and it’s good hatchet practice.
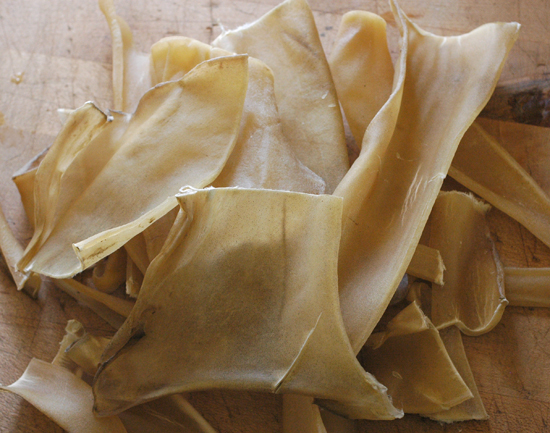
Some materials, like sumac leaves are easy to use, but you will generally have to cut up barks, roots and woods. I have almost always used a hatchet on a block of wood. I lay out a tarp to catch the chips and start hacking away. You could use a small axe, but for most people, an average sized hatchet is a good weight to start with. A heavy hatchet or axe can lead to repetitive strain injuries like carpal tunnel much faster. Just ask my tendons about that.
Hatchets can also be used to “raze” off the outer dead portion of the bark, which was sometimes so removed in traditional tanning as it was considered unnecessary or even injurious to the leather.
Chipper/shredder machines can be very effective. Garden chippers are often under-powered for thick heavy bark, but they are nice when they work. If necessary, you can break the material up into smaller pieces, or try shredding it while still fresh and softer. If there is a lot of rust in the chipper, it could contaminate and darken your liquor. Consider running some branches and leaves through the unit to clean it out.
COOKING POTS
It is possible to extract the tanning materials from plants with cold leaching, but it is much faster to cook it out. Even though I don’t know that it isn’t safe, I have always avoided aluminum. That is easy for me to do though, because I have large stainless steel pots from 3 to 5 gallons. Enamel pots could work, but be sure there are no rusty spots where the enamel has chipped away. Copper was used at one time, but large copper containers are expensive and uncommon. Large thin walled stock pots with thin bottoms can be very cheap and are fine for cooking bark, but will easily burn food if you are not careful. Try to get at least 16 quart and preferably 20 quart or larger. I find large stock pots like this to be indispensable tools in my lifestyle and they are a lifetime investment. When shopping key points to look at are thickness, build quality (especially handles) and steel quality. Some stainless imports are made of inferior metal. Read reviews carefully. When I won some fancy all clad cookware in a contest, I sold it on ebay and bought a Tramontina stock pot, which I’m happy with.

A 3 gallon stainless stock pot. Get 20 quarts or larger if you can afford it or better, repurpose a stainless beer keg.
You can also modify an old beer keg, which many home brewers do for cooking beer mash. Full sized Kegs are 15.5 gallons and a 1/4 keg is 7.5 gallons.
I also own a large pool filter housing that must hold around 25 to 30 gallons. I set it up with a valve and cook large batches of canning jars and bark in it. I have never seen a comparable one. In most units the lid is nearly as tall as the body, making them of limited use.
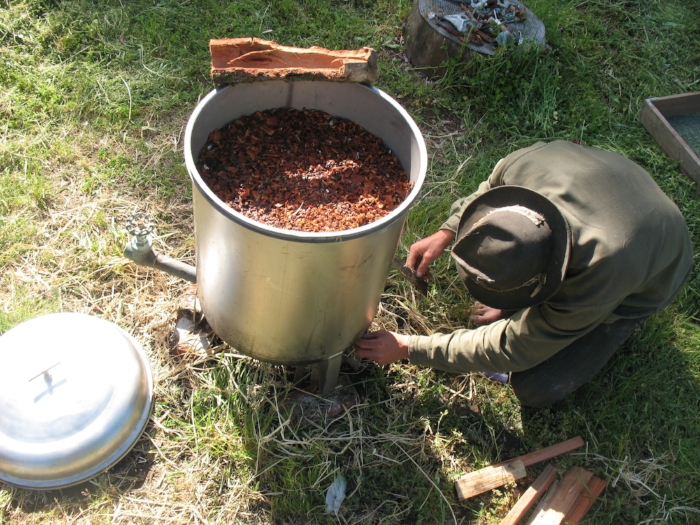
My pool filter housing bark boiler, aka the MEGA CANNER.

Happiness is tan liquor on tap. It doesn’t get any better than this folks.
SLICKING TABLE OR BOARD
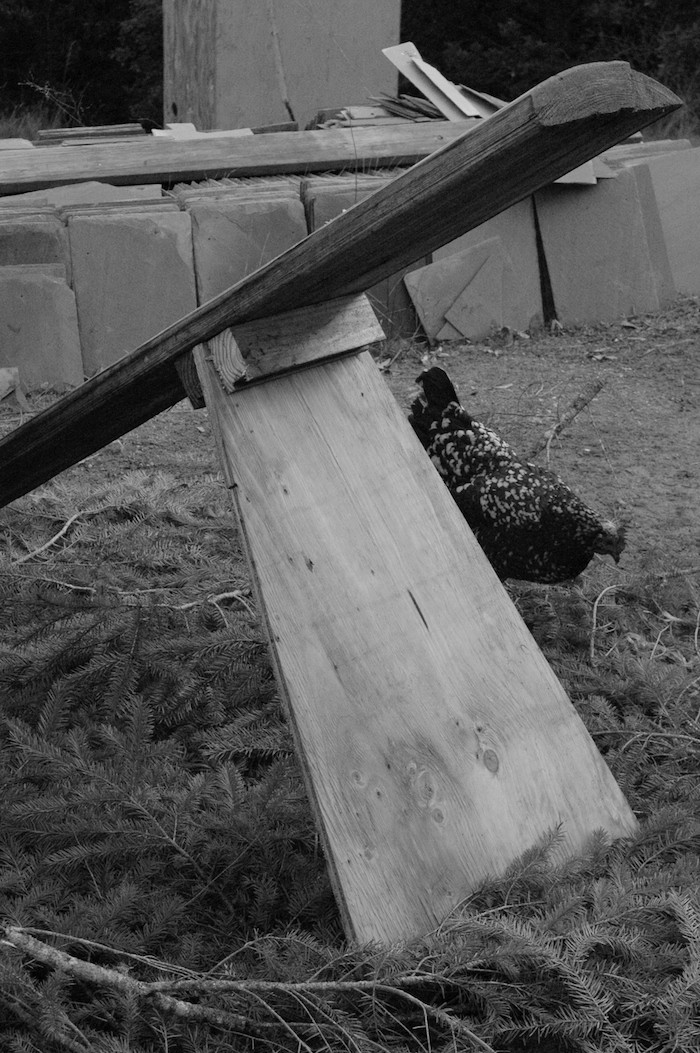
To use the following two tools, the slicking iron and slicker, you need a large flat surface of some kind. The skin is stretched, smoothed and flattened with this trio. These are only used if you want to dry the skin smooth and flat. If the hide is to be softened you dry it in some way that is less involved. A good technique for drying hides flat is to paste them down to the board with fat applied to the flesh side. This technique allows us to finish the grain out perfectly smooth and then leave it on the board to dry slowly. Just put it where your chickens can’t walk on it! You can also nail the skin to a wall to stretch it, or lace it into a frame, but for leaving hides well flattened and finished, you probably can’t beat the slicker and slicking Iron on a smooth slab. If you are doing thick skins, you can get away with something that has a rough surface, such as unfinished plywood. When working thin skins on a slab, the surface should be smooth or the texture of the surface will show through on the grain, much like the technique of rubbing a piece of paper placed over a textured surface with pencil or charcoal. I use plywood and a large slab of thick salvage plastic. Traditionally, stone tables have been used. If you run across a large surface that is very smooth, water resistant and 4 feet or more wide, grab it.

A large sheet of salvaged structural plastic that I use as a slicking board.

Cattle leather oiled and pasted out to boards to dry with the slicker. When working with thick skins, the board texture will not show through. When finishing thin skins, you will need a smooth surface unless the skin is to be softened later, or the wood grain will show through on the hide’s grain surface.
The skin can be pasted to the board with a coating of fat on the flesh side. It will stick well enough if it is dried slowly. When pasting thick skins to boards, you must use wood for thick skins or the skin may mold from drying too slow. For thin skins you can get away with pasting them to a non breathable surface like plastic, but make sure they still dry out within a couple of days. I use this technique a lot. I also often use it if I’m going to use the graining board to soften the skin (see below), but in that case, it is okay to use a rough piece of plywood, because the grain is going to be wrinkled and reworked anyway so the texture of the board showing through the skin is of no consequence.
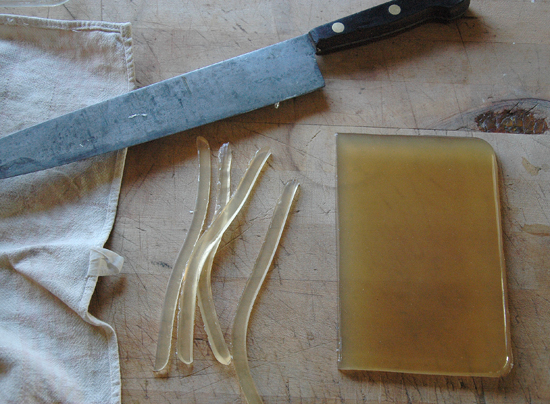
SLICKER
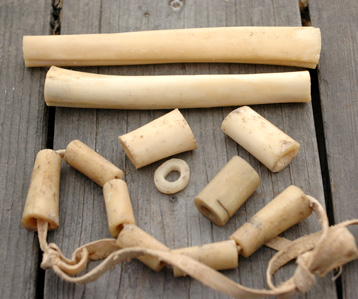
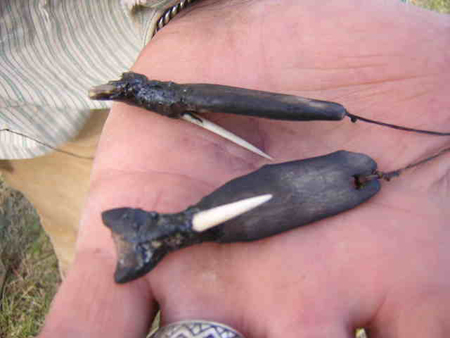
This tool is usually made of stone or glass and you can make your own with a piece of slate. it is a slab of hard material, with one rounded smooth edge, and and smooth rounded corners. A handle is nice, but not necessary. The tool is used to smooth and even the grain side of the skin and to paste it down onto a slicking table or board with fat for slow drying. You could probably have a glass shop make you one out of a 3/8” glass. A shop that works with stone tiles should be able to make you one as well, or at least cut a slab for you if they don’t already have some spare tiles of the right size. If you want to make one, cut a piece of slate or other clean hard stone and grind the edge round on a slab of cement or sand stone. Use water as a lubricant. If the stone is hard, add sand with water to make a slurry. Slate is fairly soft and easy to work. This method will even work with hard stone or glass if you are patient. It can be finished and polished with diamond sharpening hones and/or sand paper. A belt grinder would also be very handy, but the dust will mess up your lungs. Silicosis fibrosis anyone? Glass grinders are lubricated with water to prevent dust. You can also still buy slickers new, since a few leather workers use them for polishing. I have also used hardwood and moose antler in a pinch.
Size should be around 4x5 inches and 1/4 inch or more thick, with the long edge being the rounded working edge.

Vintage slickers from the museum area of the Muir McDonald Tannery in Dallas Oregon, now sadly closed. Both are slate. In the tool on the left, it appears that there may be screws for clamping the slate into the handle.

Glass plate in a leather working machine. This partly replaced and augmented the slicker. This may be the scariest machine I’ve ever seen in operation. Muir McDonald Tannery, used to polish the grain of tooling leather.

Smoothing the grain and flattening.

Home made slate slicker 1/4 inch thick and a slab of repurposed jade with the edges polished

ideal slicker edge is evenly radiused and polished.

The slicker at work dealing with wrinkly edges. This tool is always used with fat as a lubricant.
SLICKING IRON
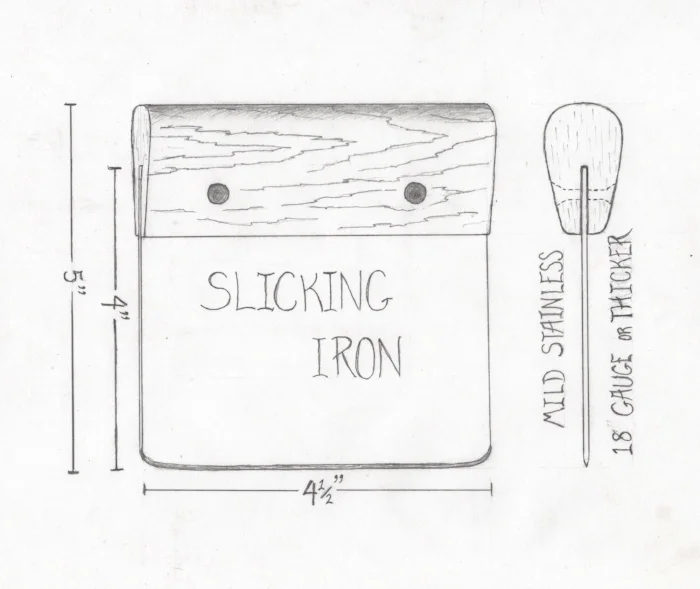
My current ideal slicking iron prototype. I would favor a thick blade. This is a tool where weight and rigidity can be advantageous.
This tool is similar to the slicker in size and shape, but it is a metal scraper with a dull edge. It is used on the flesh side of the skin to even out wrinkles and smooth and stretch the skin out toward the edges, before turning it over to use the stone or glass slicker. The slicking iron should not be super wide, about 5 inches wide at most. If I made one to my specifications right now, it would as in the diagram. It would have a very, slight radius across the working edge. I would also add a generously sized hardwood handle that is slightly drop shaped in cross section, copper riveted, and saturated in raw linseed oil. Regular carbon steel is okay to use, but always check it for rust and clean before using. Never leave it resting on the skin.

A serviceable homemade sicking iron and a cheap dough scraper. The dough scraper is on the thin side, is already rusting and should be modified to narrow it. It is probably better to check in with local scrap yards, metal fabricators and sheet metal workers.
Dough scrapers can be used if modified. Most dough scrapers are wide and could stand to have an inch or more removed from their width to make them 4.5 to 5 inches wide, which you can do with a hacksaw and files. Use a file to sharpen and modify. The corners should be rounded off well to a 1/4 inch radius and the whole thing sharpened from both sides to form a fairly obtuse edge (not too thin) and then dulled enough that it won’t cut the skin. The edge should be of such a dullness that it will easily grab the skin and pull it when the tool is used, but will not cut or gouge it. If shopping for one, look at reviews to make sure it is not too thin. Cheap scrapers will bend under the high stress applied to this tool under normal use. I bought this one and it is barely thick enough. It is also already showing some rust as cheap stainless steel is prone to do. Here are a few that look like they may be thick enough, but it’s hard to say until you see them in person. pizza cutter, RSVP, OXO. Keep in mind that they will still be better if modified by narrowing them, so dropping by your local sheet metal worker or metal fab shop first is probably smarter. They usually have lots of scrap around and all the tools to make something like this quickly, minus the handle. If you have a file, a drill and a saw to cut a kerf in a wooden handle, just have them cut out a slab for you and do the rest yourself. If you have a good metal salvage yard around, look there for scrap stainless.

This paunchy spot was eventually flattened completely by persistent work with the slicking iron and slicker.
You may very well be able to use some sort of household item or kitchen tool in place of the slicking iron, for instance a thick stainless spatula. You can also do some of this work on the beam with the fleshing knife, like stretching the skin our toward the edges. At times though you may wish you had the slicking iron for dealing with tough wrinkles and lumps in heavy hides. I would definitely say it is more necessary and useful when dealing with big thick skins. It’s not a tool you have to have to start tanning. You will know when you need it. Checkout this image of Talcon working down a paunchy spot in a bark tanned bull hide. That spot ended up totally flat in the end. This is the kind of application where the slicking iron shines.

The same hide flattened, smoothed, pasted with fat to the board and left to dry slowly.
OTHER OPTIONS FOR STRETCHING AND DRYING
If you do not have a slicking table, and need to stretch a skin out to dry, you can use a frame with ropes. Cut many holes, parallel to the edge and lace the skin evenly and tightly. This will not always remove wrinkles and paunchy spots like slicking out on a flat surface can. Framing a hide is also a lot of work and wastes skin around the edges. Similarly, you can stake the skin out flat just off the ground. A better option than both for most people will be to nail the skin out to a large board or wall. Use hot dipped galvanized box nails if you can. Any nail that will rust is not recommended and nails that are already rusty are a sure way to leave black stains on your hide.
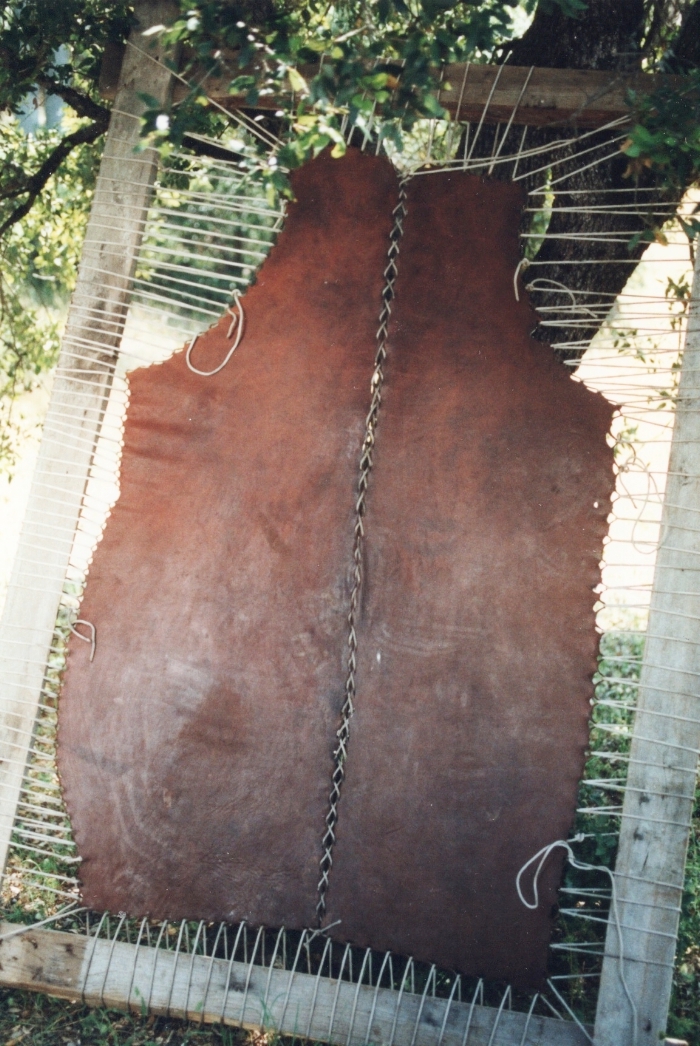
Horse sides framed for drying. Not the best solution in terms of labor and material conservation. It also does not provide the best options for flattening and smoothing the skin.
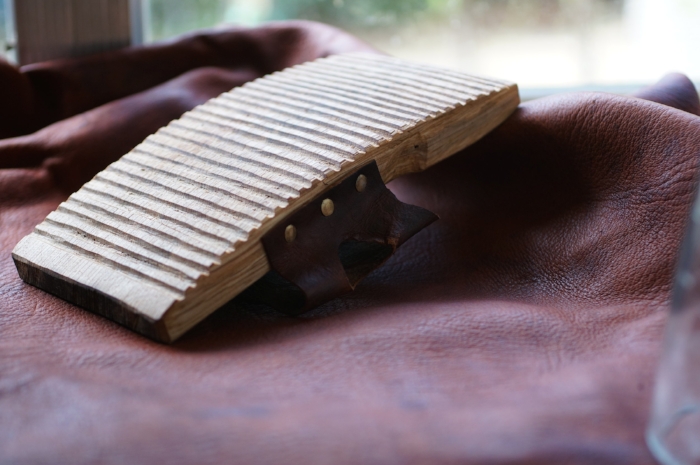
PALM AND ARM BOARDS

Old engraving of a Currier at work with an arm board. If you look closely, you can see that the artist illustrated the wooden teeth on the sole of the board
Skins can be softened by rolling on a table with the hands and forearms. These tools are used to make that job easier and work the skin a lot harder.
The soles are designed to grip the skin’s surface. One type has a wooden face with ridges carved into the sole from side to side for when the tool rides on the flesh side of the leather. Boards with cork glued to the soles are used when the tool will contact the grain side.
There are two basic sizes, a hand board, sometimes called a pommel, and an arm board. The hand board is short, 8” or less, with a strap that goes over the hand. The arm board rests along the forearm and has a strap at the back and a peg at the front for a handle. The difference is size and scope of work. Any home tanner ought to do fine with hand boards.
If the skin is worked folded grain side to grain side, the result is a pleasing wrinkled grain surface since the grain is crushed and compressed. The process of creating that grain effect is called graining, thus the term graining board. In this case, the sole of the tool touches the flesh side only and the teeth cut into the wood provide excellent grip.

Postion for graining process. Note the ridged graining board contacts the flesh side only.
Surface produced by graining

If a board is used with the skin folded flesh side to flesh side, the grain surface is left smooth because it is stretched instead of compressed. The cork soled board is used in this case to prevent denting and damage to the grain surface.

An antique cork faced arm board from the Muir McDonald Tannery in Dallas Oregon. Note that the cork is partially worn off on the front of the tool

Fancy Antique cork soled board.
MALLET
In some cases, we may want the skin to be compressed and hardened, not softened and broken loose. The tool for this is a wooden mallet with a polished face, which is used to condense the leather when it’s in a damp, but not wet state. The face can be close to flat, but the edges have to taper off and round out gently. If you are leaving any kind of dents in the skin, then you need to either hit the leather flatter, or refine the edges. The leather should be smooth when finished. Use the heaviest wood you can, mine is probably iron wood and is extremely dense. Polish the face to a gloss finish. In the past, both Iron and brass/bronze mallets have been used, but make sure they are very clean and polished, with zero rust or oxidation. Even so, you are risking staining the skin with a steel hammer, so I recommend sticking with wood.

The mallet for compressing and firming leather should be dead smooth. Use the densest wood available. The hide underneath in the foreground has been pounded leaving it about 1/3 thinner, much denser, stiffer and polished. Otherwise, it was exactly the same as the top piece.
STAKE
This is a dull metal blade set into a post that is used for softening and breaking open the fiber of skins. They are useful if you are trying to get skins really soft and for working furs. Unless you are doing one of those two things, it’s not a very essential tool. I find them more useful in braintanning buckskin and working furs of any kind. The post can be permanent or in a stand of some kind for portability. The blade should be rounded at the corners and they usually have at least a very slight radius. The width of the blade can vary. For any kind of large skins, a wider blade would be better. 5.5 inches with the edges rounded to a 1/4 inch radius and a very, very slight radius to the whole edge would be good for general home tanning work of all kinds. A lot of dough scrapers are 6 inches wide, so that might be a good source of material for a blade. It should be stainless if possible, so you can leave it wet or in the weather. Use stainless steel screws as well.

A simple portable stake used for classes. A fixed stake or one on a heavy base is better if you’re going to use it a lot.

Use stainless steel screws

A good stake blade design for the home tanner.
This blog post and similar content is informed by almost 30 years of research, experience and communication with other tanners. You can support my efforts to bring back and preserve these traditional self reliance skills and arts by sharing content to friends, forums and social media, with general financial support on patreon.com/skillcult, or with one time donations using the link in the side bar. I also now keep separate accounts for earmarked donations toward research in tanning and apple/plant breeding. If specified, donated funds will be used for things like tools and materials, and outside labor solely related to either endeavor. Thanks for reading :)